
Securing the network
2026 Lab Refresh Edit: This is no longer how the lab is configured, but leaving here for historical purposes
The lab has grown a bit since I wrote about it in #3 to address many of the issues I identified in #4.To start here is the new network map:
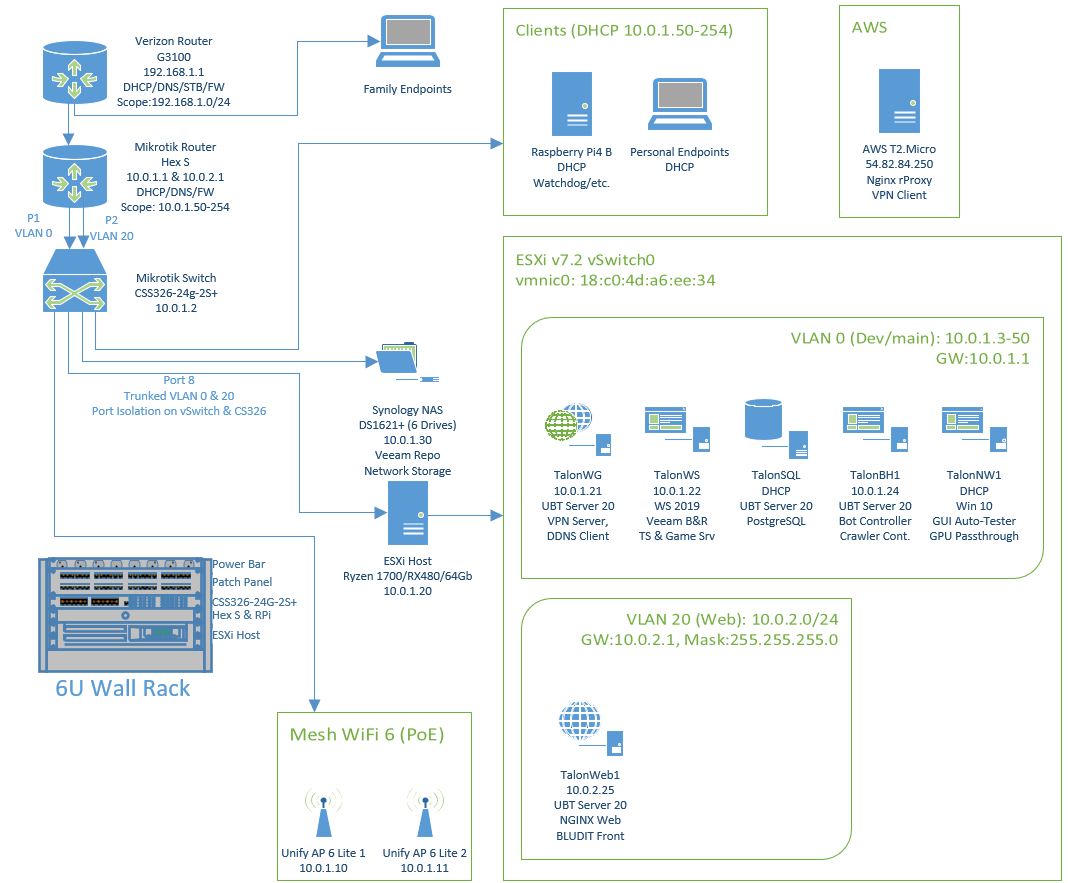
Here’s the rough list of changes:
- Removed marcuslynn.com from the current DNS records.
- Purchased a new domain, and configured DDNS on TalonWG to update it. (This way I always have a connection to the homelab).
- Created a new subnet, 10.0.2.0/24.
- Created VLAN20.
- Configured switches to isolate VLAN0 & 20.
- Configured firewall rules to isolate 10.0.1.0/24 & 10.0.2.0/24.
- Moved TalonWeb1 onto the new subnet.
- Reconfigured website frontend for the new subnet. (The lack of documentation is astounding, grep -r is a lifesaver).
- Opened an AWS Account, and created a free T2.micro instance.
- Pointed marcuslynn.com domain DNS to the AWS Public IP. (Standard A record, nothing fancy)
- Configured Wireguard client on the instance, connected it to <new homelab domain>. ;)
- Installed & configured Nginx Reverse Proxy, pointed it to TalonWeb1 at 10.0.2.25.
- Configured lab router to allow web traffic between web server & WG server.
- Got an SSL cert, reconfigured the reverse proxy for it.
- Fixed a ton of other stuff along the way (?)
- Bonus: Renamed wireguard server to TalonWG to fit the naming convention :D
The largest addition is AWS into the mix. The reasons for this are two fold, firstly to get hands on experience with the AWS tech stack and second to put a layer between the lab and the outside world. The main issue I had with the old setup was that I was directly exposing the lab to the internet over port 80 to a front end that, if compromised, could lead to exploitation across the rest of the 10.0.1.0/24 subnet. In AWS I deployed a free T2.micro instance which while very low powered, serves the purpose perfectly and at no cost to me. On the instance I deployed a Nginx reverse proxy with a connection to my VPN server. The simplified connection flow looks something like this:
- Clients connect to the AWS instance over port 443/HTTPS. (or 80, auto redirects).
- Nginx takes their request and proxies it over a Wireguard tunnel back to my lab.
- Once the request hits the wireguard server, it moves on to the webserver:80.
- Webserver serves up the request back to the wireguard server, which tunnels it back to AWS.
- The reverse proxy slaps some good ol’ HTTPS on it & serves the client.
I do have concerns about exactly how much of a load the instance can take as I suspect the CPU will be the bottleneck. Unfortunately I manually set it all up so creating a more scalable solution is on the horizon with a more containerized workload. However, given this is my first Nginx implementation I’m much more confident when that time comes.
Here’s to a more secure network?
~Marcus