
Infrastructure Layout
2026 Lab Refresh Edit: This is no longer how the lab is configured, but leaving here for historical purposes
EDIT: I’ve reworked a large amount of the lab layout to address some of my security concerns. See this post for an updated lab network map.
On the surface my lab is fairly simple and straightforward, but the current implementation has some fundamental issues which I’ll discuss in the next post.
To start here is the network map, made in Visio.
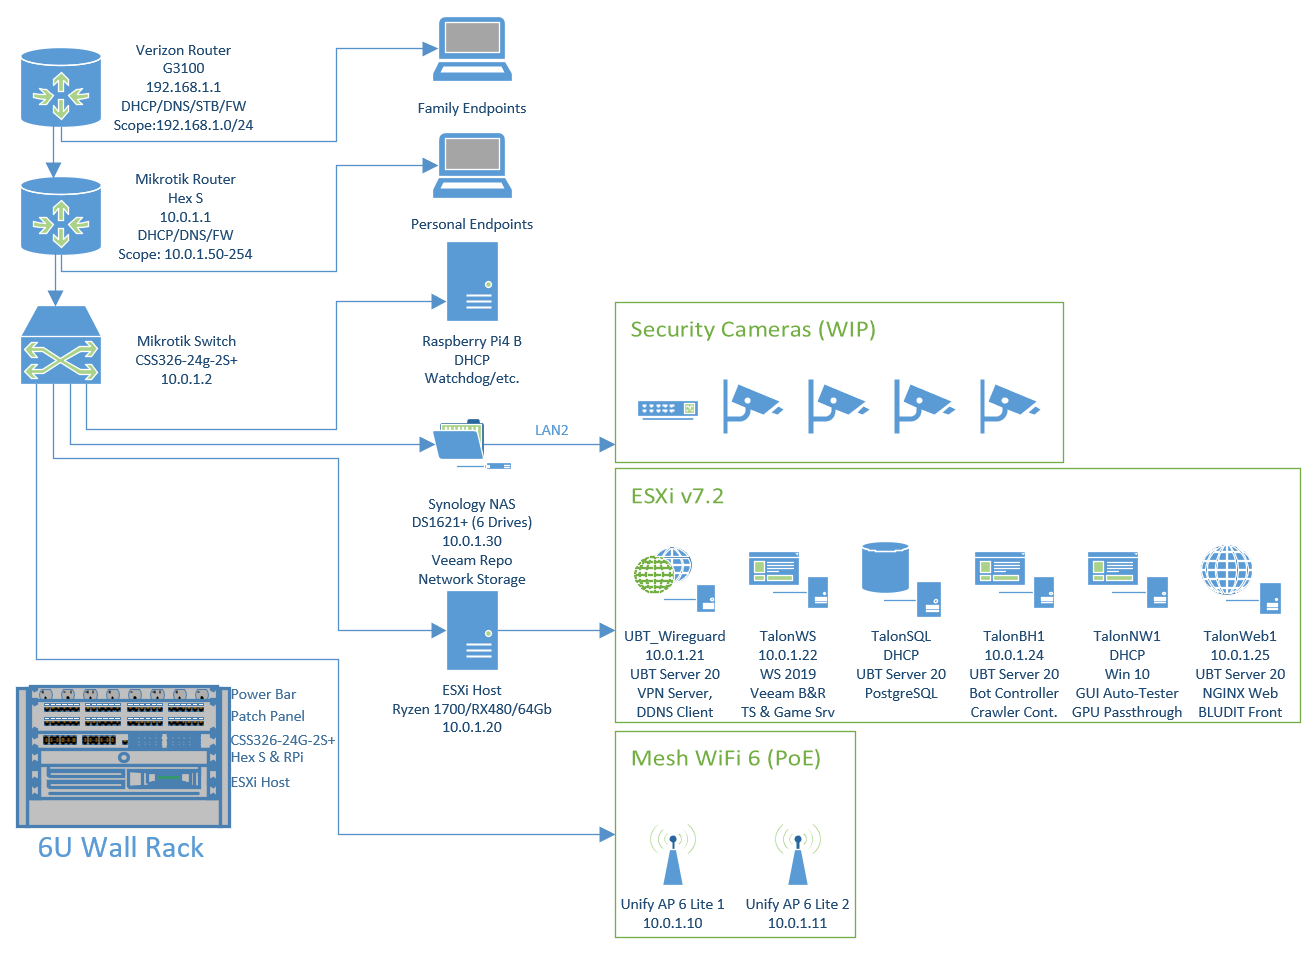
There are five key pieces to this setup, with the ESXi host being the most important.
- Verizon Router
- Mikrotik Router
- Mikrotik Switch
- Synology NAS
- Custom ESXi Host.
In the creation of the lab there were several primary factors that played a role in the hardware and layout used. In no particular order here’s what I had to work with:
- Very limited space
- I measured and found that I could fit a 6U rack, nothing more.
- Limited space means limited hardware, to make the most use of it I decided on a single powerful host instead of a USFF cluster See: ServeTheHome Project TinyMiniMicro.
- Existing components.
- I’ve built many computers over the years and I had a Ryzen 7 1700 CPU (8c/16t) on hand which would serve as the foundation for my build.
- My friend had a spare ESXi Enterprise license that he is allowing me to use, so it made sense this way.
- Mikrotik’s equipment is fully featured, cheap, and without any guard rails.
- Mikrotik is a fantastic brand for the cost and I’m happy with my choice to go with their router and switch.
- The UI is SUPER basic, but between that and SSH it’s not too bad once you get the hang of it.
- It will not hold your hand and as I’ve learned it will let you disable the management interface rendering the router a fancy paperweight :). This is actually something I wanted, it’s forced me to actually learn networking concepts without leaning on a fancy portal or front-end.
- I decided to build a second network behind the Verizon G3100 router for the main reason of giving me a safe place to muck about without disrupting other’s ability to use the internet. I’ve brought my lab crashing down several times so I’d say that was a good move..
- Power & Heat.
- Not much to say here but I wanted to keep the rack under 600-700 watts total. Having a single host instead of several weaker hosts helped keep things manageable.
Here’s a look at the physical installation itself. Heat was a big concern so the addition of a pass through vent into a utility room to the right has helped a ton. A 15A power line was added to the back to supply the rack with power.
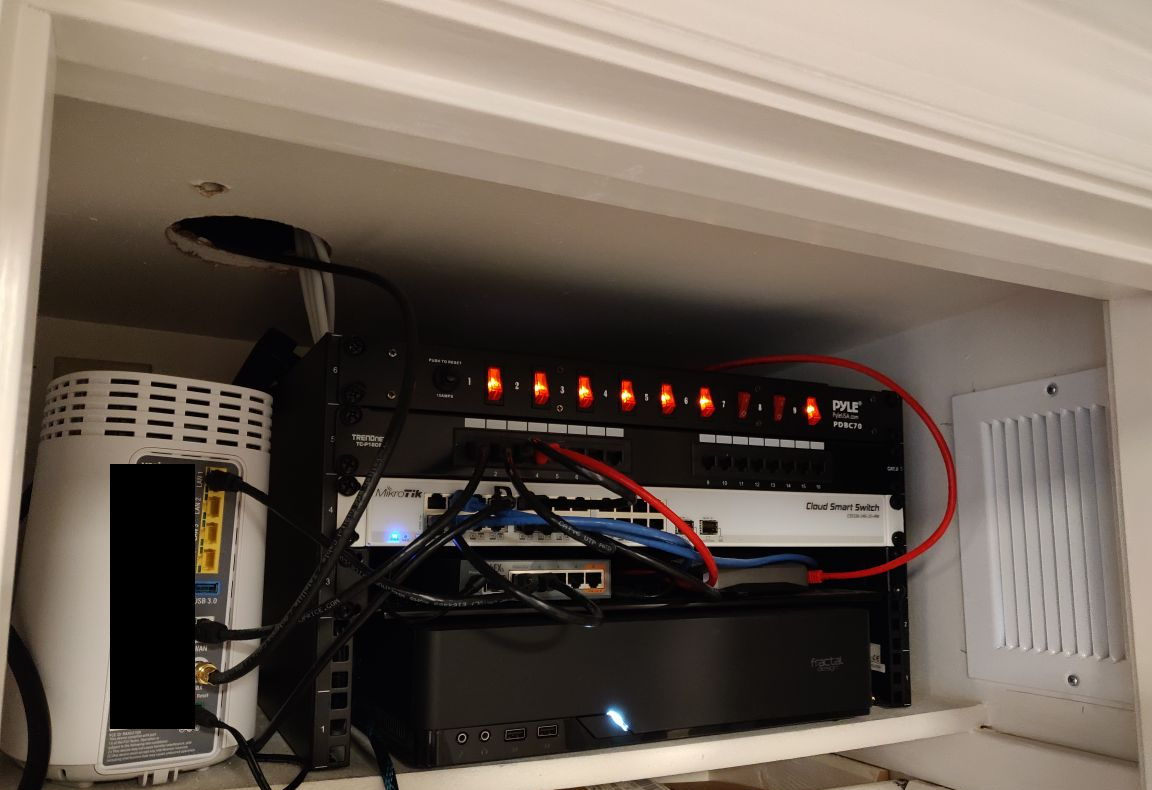
The ESXi host sits in the bottom 2U of the rack, supported by the shelf. It’s easily serviceable and fits with a few mm of clearance. As explained above I had the Ryzen CPU already on hand, but to make it fit in such a small space I had to do some real digging and measurements to fit it. Here’s a list of components for the build:
- CPU: Ryzen 7 1700, 8 cores/16 threads.
- Case: Fractal Design Node 202 Black Mini-ITX.
- Power supply: Integra 450w SFX PSU, bundled with the case.
- GPU: RX480
- Ram: 2x32GB DDR4 3200 Corsair low-profile memory
- CPU Cooler: ID-Cooling IS-60
- Motherboard: Gigabyte B450 ITX
- Storage: SK Hynix 1TB NVMe
Besides the CPU and GPU, both of which I already had, the total extra cost of the build came out to about $760. The full sized RX480 graphics card has come in handy too, I’ve used it with several of my bots and a password hash cracking VM. That card started it’s life as a crypto-miner before I purchased it back in 2018, after the first big bitcoin crash. I snagged it for $80 on ebay which was a steal especially compared to today’s market. Needless to say it’s been given a slightly better treatment with me, although its packed in tight and ran at slightly high temps- oh well.
One unfortunate downside to this build is the lack of multiple NICs. There was one board I found that had 2x Intel 1GbE NICs but it was in the $500-600 range, out of reach for me given the rest of the build. Not all is lost though because I can overcome this limitation by trunking VLANs and using ESXi’s vSwitch. Another reason I went with this was because it was the ONLY ITX AM4 socket board to support 64 GB of memory. Every other board that I could find only supported 32 in a 2x16 configuration.
Not shown is the Synology NAS which I have in another closet located elsewhere. Thanks to my buddy Cliff who helped me run 4x Cat-6a runs up a total of 3 floors, fun times. Of the four runs one is dedicated to an AP, one to my computer room, another to my workshop, and the 4th was ran to the attic and capped off for future expansion. The Synology serves as both network storage and as a repo for the Veeam B&R backups.
As of writing this I have six virtual machines running on the ESXi host. Here’s a breakdown of each one:
- UBT_Wireguard: Wireguard (VPN) and DDNS client host. EDIT: This has been renamed to TalonWG.
- Note: This was my first VM, prior to settling on the naming convention.
- TalonWS: Windows Server 2019, licensed, to run Veeam B&R, Teamspeak, and a few Windows-specific utilities. The nice thing about Veeam here is I backup the entire host, so as I create new VMs/guests they’re automatically in scope of the backups.
- TalonSQL: PostgreSQL server. This is where I store my D A T A…. aka a few databases that my bots use as a place to save what they find. I designed and maintain those DBs, nothing off the shelf there.
- TalonBH1: This is a bot host, it runs a few of my Python based bots.
- TalonNW1: This is a Windows 10 VM that has that RX480 passed through to it. It’s main purpose is for scraping via OCR and running Windows-based software but that RX480 comes in handy for other purposes.
- TalonWeb1: The latest addition, running a NGINX webserver with a Bludit frontend.
The last thing I haven’t mentioned is the Raspberry Pi 4, model B. I started my homelab on that thing and it’s served me well, these days I just use it to make sure everything is running well and occasionally loan it out to friends who need a Pi. Lets be honest the ESXi host is way more flexible.
That’s where things stand for now, I’ve got a few plans for the future but I’ll save that for the next post. Until next time stay safe.
~Marcus